Thursday, May 26, 2011

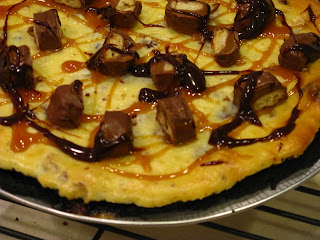
Twix Cheesecake

My daughters primary teachers at our church were out of town for a couple weeks.  She really missed them because they are amazing teachers and friends.  So, she asked if we could make them a treat to take over to them.  When I asked her what she was thinking, she suggested a cake.  As we got to talking, we decided on a cheesecake and she decided to add some Twix candy bars to it.  Such a great idea.  It smelled and looked so yummy.  So yummy that we have plans to make one for all of us to enjoy here at home!


Twix Cheesecake
20 Oreo cookies {with creme filling}
3 tablespoons melted butter
Two {8 oz.} packages cream cheese, at room temperature
1/2 cup sugar
2 large eggs
18-20 chopped Twix Fun Size Candy Bars {2 cups total)}
hot fudge
caramel syrup
6-8 chopped Twix Fun Size Candy Bars

To prepare the crust: Crush cookies (either in a sealed plastic bag, blender, or food processor) and mix with melted butter. Use your fingers to press into a lightly greased 9-inch pie dish or 8x8 baking dish. Place crust into the freezer for about 20 minutes, or until it is firm.

To prepare the filling: With an electric mixer in a large bowl, beat cream cheese with sugar and eggs until mixture is smooth. Stir in chopped Twix bars. Pour into frozen pie crust. Bake at 325 degrees for 35 to 45 minutes, or until set in center; let cool.  When cheesecake is completely cooled, drizzle with hot fudge and caramel syrup.  Garnish with more chopped Twix bars. Chill until serving. 
Muddy Buddies

I have a brother that loves loves loves this stuff.  My kids love it and every time we make it, I always think of my brother.  It is so great. It is funny how some foods and/or smells can bring a memory to mind when cooking, baking, eating, etc.  


Muddy Buddies
9 cups Corn Chex cereal
1 cup semi-sweet chocolate chips
1/2 cup creamy peanut butter
1/4 cup butter or margaine
1 teaspoon vanilla
1 1/2-2 cups powdered sugar

Pour cups of cereal into a large mixing bowl and set aside. In a medium sized saucepan, melt chocolate chips, peanut butter and butter together. Once fully melted and creamy, stir in vanilla. Pour mixture over cereal, stirring until evenly coated.

Pour chocolate coated cereal into 2-gallon resealable food-storage plastic bag. {I use plastic grocery sacks doubled. Of course that have been washed and fully dry}Let cereal cool for a couple minutes.  If too warm, the powdered sugar will just "melt" to cereal.  Once cooled a little, Add powdered sugar. Seal bag {or tie plastic bag handles closed}shake until well coated. Store in an air tight container or in the refrigerator. 

Meat Pie

This is something I have heard many people talk about, but have never made it.  So I finally snagged a friends recipe and made them.  When you hear pie, you think of the fruit filled, chocolaty silk, creamy meringue, dessert kind.  Or if you are really into numbers, you think of the mathematical term.  But in this case, it is the main dish.


Meat Pie
1 lbs hamburger
1 green pepper ~ chopped
1 red pepper ~ chopped
1 medium onion ~ chopped
2 stalks of celery ~ chopped
1 egg
1/4 cup water
Creole seasoning to taste
Garlic salt to taste
2 refrigerated pie crust {you can also make your own. for me it all depends on time that day.}

Brown hamburger & drain grease.  Before hamburger is fully done, add in green pepper, red pepper, onion & celery till vegetables are tender.  Once grease is drained, add seasonings into mixture.  Roll out  pie crusts onto cookie sheets lined with foil and sprayed with cooking spray.  

Divide the meat mixture into two.  Spoon each meat mixture into a pie crust, keeping it all on one side. Once spread evenly on one side, fold other half of crust over and "pinch" crust edges together. When it is folded it will look like a calzone. Whisk egg and water together and brush over tops of pies. Cut 2 slits in top of each pie.

Bake meat pie at 400 degrees for 25-30 minutes or until crust is golden brown.

{*You can make smaller ones and use them as appetizers or a little side dish to something else.}

Thursday, May 19, 2011

Blenders

I am a girl that gets excited to try out new kitchen gadgets.  You can always find me in the "kitchen appliances" at any store.  There are 2 things I have to have & use just about daily in my kitchen.  One is my Kitchen-aide mixer and the other is my Ninja Professional.  My husband got it for me as a gift.  We had seen it in a few stores, on tv, heard how amazing they are, tested them at a couple place, etc. Never decided to get one, but hubby surprised me with one.  It is amazing!  The things this blender can do.  I love how there are different pitcher sizes. This is a blender dream! Learn more about the Ninja Blenders and see which one you like!

Taco Salad

I love love love salad during the summer.  There are so many topping options to put on, plus it can be a light and simple meal. There is nothing better then having fresh fruits & vegetables.  Taco salad can be made a few different ways.  Really, you make it to fit the cravings. I have done taco salad with yummy Mango Salsa on it ... Oh my delicious.

Taco Salad
1 lb hamburger
1 envelop taco seasoning {if you aren't using a mango salsa}
1 head lettuce
1 can beans of choice ~ pinto, black, kidney, red, etc. 
1 can corn {or 2 cups frozen corn or 3 - 4 ears of corn cooked & shaved off ear}
1 can sliced olives
taco bowls 
Basically any toppings that you want. 

Topping ideas:
tomatoes
onions
cheese
sour cream 
salsa of choice
jalapeños
 

Brown hamburger & drain grease.  Add in taco seasoning is using. Chop head of lettuce and add desired amount into taco bowl.  Then add in meat.  After hamburger is added in, top with the desired amount of topping choices. 
*If you aren't using taco bowls, you can also crush up Frito chips {or leave them whole} and add them to the salad.  Gives a nice touch.

Homeade Macaroni & Cheese

Like most kids, my children love macaroni & cheese.  They will eat the boxed kids, but they prefer when I make them homemade.  Lets be honest, homemade anything is better.  Right?  The other day they asked for homemade macaroni & cheese.  This is great for just lunch, or add it as a side to your dinner. 

Homemade Macaroni & Cheese
1 bag noodles ~ noodles of choice
1 can cheddar cheese soup 
4 tbsp butter
1/4 - 1/3 cup milk
seasoned salt ~ to taste

Cooke noodles as directed on package.  Drain noodles & add butter.  When butter is fully melted, add in cheddar cheese soup.  Mix a little and then add in 1/3 cup milk to noodles.  If you want it more "creamy" add in a little more milk at a time. Sprinkle seasoned salt over noodles. 

Monday, May 16, 2011

Avacados

Here are some really interesting nutrient facts about Avocado's.  I got this from a friend who is a Dietitian. 

 AVOCADOS contain oleic acid, a monounsaturated fat that helps to lower cholesterol and protect against breast cancer.They also contain a very concentrated dietary source of the carotenoid lutein, as well as measurable amounts of related carotenoids such as zeaxanthin, alpha-carotene and beta-carotene. Avocados have significant quantities of tocopherols (...vitamin E), and are a good source of potassium, a mineral that helps regulate blood pressure and guard against circulatory diseases like high blood pressure, heart disease or stroke. 

Three easy Steps on picking a ripe Avocado
#1: COLOR. The skin of a ripe avocado should be a very dark green, almost black.
#2: FIRMNESS. A ripe avocado isn't rock-hard and it isn't mushy. It should have a fleshy feel, like raw meat. 
#3: MARKINGS. Choose an avocado without bruises or scars.

Carmel Dip

Again, Sorry no picture for this one. This is another fruit dip that is put together in about 5 minutes.  My mom makes this anytime there is a fruit platter for something.  It is the best dip out there.  It is good with any kind of fresh fruit.

Carmel Dip
1 jar Mrs Richardson's Carmel Butterscotch ice cream topping ~ unheated
1 {8 oz} block cream cheese ~ softened

In mixing bowl, mash us cream cheese.  Add in Carmel Butterscotch topping and blend till well mixed together.  Keep refrigerated.

Sour Cream & Brown Sugar Dip

Sorry no picture for this one. This is another easy fruit dip.  It is amazing with strawberries!  There is really no exact measurements to it, other than the sour cream.

Sour Cream & Brown Sugar Dip 
1 pint sour cream 
brown sugar to taste {about 1/3 cup - 1/2 cup brown sugar)

Mix the 2 ingredients together. Enjoy with fresh cut fruit. Keep refrigerated. 

Grilled Teriyaki Chicken

My mother in law makes this and it is so so yummy.  Plus it makes a ton, so it is great for when company is coming over to eat. During the summer the best smell is BBQ Grilling {and fresh cut grass.}
Grilled Teriyaki Chicken 
2 cups 7-Up
1 cup coy sauce
1 cup vegetable oil
garlic powder to taste ~ the more powder, the more garlic flavor
up to 5 lbs chicken ~ either friers or breasts

Mix all ingredients together.  Place chicken into sauce and let marinade for several hours, turning if necessary.  Grill chicken till done.  

*To shorten grilling time, heat chicken in marinade on stove top and bring to a boil for a few minutes before putting on grill.

Raspberry Salad

This is also known as Pink Salad.  Every time we take this to a BBQ or something, it is gone with in seconds.  As you read the ingredients, you will probably think "This is just like the Mandarin Orange Salad."  You are correct.  The raspberry is just a nice change to it. This is my hubby's favorite jell-o salad.

Raspberry Salad
1 {16 oz} cool whip ~ thawed
2 bags frozen raspberries
2 small containers cottage cheese
1 large box raspberry jell-o

In a large mixing bowl, pour raspberry jell-o powder into bottom of bowl. Add in thawed cool whip and mix well.  Once mixed, add in cottage cheese & fold into cool whip.  Last, add in frozen raspberries and mix.  refrigerate for 1 hours before serving, so it can set up a little, but not necessary.

Lemon Spaghetti

The Lemon Spaghetti goes great as a side dish to grilled chicken.  This give any summer dish a nice fresh burst of flavor.  Kids like it because it is noodles. Adults like it because of the uniqueness and flavor!

Lemon Spaghetti
1 (14.5 ounce) package spaghetti
1 tablespoon extra-virgin olive oil
1/3 cup unsalted butter
2 cloves garlic, minced
1 (16 ounce) carton sour cream
1 tablespoon finely grated lemon zest (1 lemon, zested)
1/3 cup lemon juice, freshly squeezed (about 1 1/2 medium lemons)
1/3 cup chopped fresh Italian parsley
1/2 cup grated Parmesan cheese
1/2 cup freshly grated Parmesan cheese
juice from 1/2 lemon
freshly ground black pepper and kosher salt

Cook spaghetti + olive oil according to package directions (minus a couple of minutes)- you want it to be al- dente. Drain spaghetti and place in a large bowl.   Melt butter in a medium skillet. Add garlic and cook until sizzling and lightly browned, 1 to 2 minutes. Remove from heat; stir in sour cream, lemon zest and 1/3 cup lemon juice. Pour lemon sauce over the spaghetti and stir. Add Italian parsley and 1/2 cup Parmesan and stir some more. Pour lemony spaghetti in a greased 1.5 quart casserole dish.  

Cover dish with foil and bake at 400 degrees for 30 minutes. Take dish out of the oven and remove foil. Sprinkle 1/2 cup Parmesan on top. Drizzle juice from 1/2 lemon over the top of the pasta. Sprinkle pepper and salt on top. Place dish back into the oven for 7 or 8 minutes, just until cheese is melted and noodles have begun to turn golden in a few places. Serve immediately.

Pizza Rolls

These are so easy & fun to make.  Especially with kids and in the summer.  You can really put whatever you want in them, but we just always keep it simple.

Pizza Rolls
3 loaves of frozen bread loaves
1 bag pepperoni
4 cups shredded cheddar cheese

Pinch some dough off thawed bread loaves, about the size of a golf ball.  Stretch dough out to a little bigger than palm of hand.  In center of stretched dough, add cheese & 3-4 pepperoni slices.  Fold edges into center & pinch shut.  Lay pizza rolls seam slide down on a greased cookie sheet.  sprinkle a little cheese into of rolls

Bake at 400 degree for about 15-20 minutes.  Rolls need to be golden brown. 

Dip rolls in choice of dipping sauce.

Tuesday, May 10, 2011

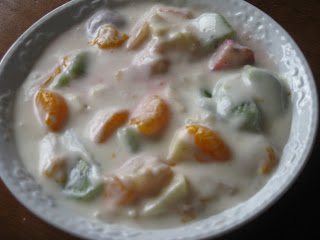
Vanilla Fruit Salad

So great for summer!  It is fruity, light & takes care of that "sweet tooth" as well.  My kids love trying to guess every piece of fruit when they eat this.  You can really add whatever fruit you want into it as well.


Vanilla Fruit Salad
1 {6 oz} box vanilla pudding ~ instant
1 {16 oz} cool whip
1 can mandarin oranges ~ drained
1 apple of choice sliced into bit sized pieces
1 can pineapple chunks ~ drained
2 banana ~ sliced
2-3 kiwis ~ sliced
3 strawberries chopped

In mixing bowl, add vanilla putting & cool whip together.  Mix till well blended.  Add in all fruit & mix.  Refrigerate for 1 hour before serving.

Beef Enchiladas

My daughter picked these for dinner this month.  It is great because you can slip some healthy zucchini in there.  my kids love fruits & vegetables, so that make is nice when it comes to dinner time & having a little of everything.  Also, with this recipe it is nice to have an option on chicken, shredded beef or quick ground beef.  These get put together in no time.


Beef Enchiladas
1 lb lean ground beef
1 1/2 cups diced onion
1 1/2 cups finely diced zucchini
12 tortillas ~ corn or flour
2 1/2 cups enchilada sauce ~ spice of choice
3 cups cheddar jack cheese ~ shredded
1 can pinto beans ~ drained

Brown hamburger in skillet.  Drain fat from hamburger & dump meat in mixing bowl.  Add onions & zucchini to skillet.  Saute' till tender, about 3-4 minutes.  Remove vegetables from skillet & add them in with hamburger.  Add in 1 1/2 cups cheese & pinto beans along with 1/2 cup sauce. Mix well.  
Spray a 9x13 pan with cooking grease.  Assemble enchiladas & put in greased pan.  once all enchiladas are assembles & in pan, pour remaining sauce over all enchiladas & sprinkle with remaining cheese.  

Bake at 350 degrees for 30 minutes, or until heated through.  

You can also garnish enchiladas with shredded lettuce, sliced avocado, sour cream or chopped cilantro.

Monday, May 9, 2011

Apples

There are so many apple choices out there.  So many that sometimes it can be overwhelming if you don't know much about any of them.  You may also think, "I have my favorite & I am sticking with it", but it never hurts to learn about some of them.  Here is a little information.  Who knows, you might decide to try one of these and change to a new favorite.  I, myself, love Jonagolds and Honeycrips.  Both can be pricey. 

Jonagold Apple is a cross between Golden Delicious and Jonathan,  with the best of both worlds--firm flesh and a sweet-tart taste.

Honeycrip Apple is one of the sweetest apples around. It has a very distinctive juicy crispness and is firm. 


Granny Smith Apple is one of the most popular baking apples.  It's a tart and tangy apple with a firm flesh.  Awesome for baking.

Winesap Apples is one that has a tart and "spicy" very thick skin which makes it good for storing, and a very distinctive white flesh. This apple is great in salads, cider, pie baking and applesauce.

Rome Beauty qualifies as one of the prettiest apples, due to its perfect round shape and deep red color. Mildly sweet and tart.

Golden Delicious is favored for its naturally sweet flavor.  Has a very thin skin that breaks easy. Goldens  make great apple butter and add a splash of color to any salad.

Gala Apples have a crisp bite and a mellow sweetness. Great to add to any fruit salad to give it that crisp bite. 

Ranch Pork Roast

Such a yummy crock pot recipe.  I got this recipe from my mother in law.  My kids love it.  Plus it is a nice switch from always a beef roast.  Nice thing crock pot recipes ... Once you put it all in, You are basically done.  Just check on it a few times. This is also really yummy to just make the pork roast & have over rice of noodles.


Ranch Pork Roast
2 1/2 lbs boneless pork shoulder roast
1 lbs red skinned potatoes ~ havled
1 (10 3/4 oz) can cream of chicken soup 
1 (8 oz) pkg. cream cheese ~ softened & cut up
1 envelope dry ranch dressing mix

Trim fat from meat.  In a large skillet, coated with cooking spray, brown meat on all sides.  Place potatoes in slow cooker {3 1/5 - 4 quart}.  Place meat on top of potatoes.  In large bowl, whisk together soup, cream cheese and dry dressing mix.  Once well mixed, spoon "gravy" over meat & potatoes in cooker.  Cover and cook on low heat for 9-10 hours. You can also do high heat for 4 1/2-5 hours.

Chocolate Mousse Cake

This cake seriously looks like so much time was spent on it, but really ..... it was a piece of cake to do.  {No pun intended} The chocolate mousse can be used in desserts or it can be put into little cups & eaten by itself.  Delicious.  I made this for my mother in law & grandmother in law for mother's day.  It was a great treat.  This exact cake, with a few changes, has been made as a birthday cake in the past.  Instead of heath chips & letting the hot fudge run down the cake, "spread" the hot fudge all over the cake & then line the bottom of the cake with fresh strawberries. Very very yummy.


Chocolate Mousse Cake
1 devils food cake mix
1 recipe Chocolate Mousse ~ below
1/3 cup Heath Chips
1 jar Mrs. Richardson's Hot Fudge

Mix cake mix as directed on box.  Divide batter into 2 round oiled & floured cake pans.  Bake cake as directed on box.  Flip cakes out of pans immediately after baking.  Let cool completely.  Place one cake on serving plate & spread chocolate mousse onto cake & stake other round cake on top of mousse.  Heat hot fudge up.  Make sure it isn't extremely hot {Too hot & it will "melt" the mousse}.  Dump hot fudge over top of cake.  You can either "spread" fudge over all of cake or just let is run down by itself.  Top with Heath chips or fresh strawberries. 

Chocolate Mousse
1 cup sugar
3/4 cup real butter ~ room temperature
9 tbsp cocoa powder
3 tbsp oil 
1 tsp vanilla
3 eggs ~ room temperature

Cream together sugar, butter & vanilla till fluffy.  In separate bowl, mix together cocoa & oil.  Blend as well as you can.  Add cocoa mix into sugar mixture.  Cream together till blended.  Add in 1 egg at a time.  Refrigerate mousse for 2-4 hours before using/eating.

Saturday, May 7, 2011

Lemon Raspberry Cupcakes

Happy Mother's Day! I made these to give out to some neighbor moms in my housing area.  Some where home to receive one and some were out.  It was just a cute little "gift" to them for being such great moms. My girls keep telling me "Tomorrow is a special day for you!"  Every day is a special day for me.  I am a mom to wonderful, beautiful, smart, caring children and have an amazing husband that is talented, loving, full of service and more.


Lemon Raspberry Cupcakes
1 lemon cake mix
 2 tbsp fresh lemon zest
1 jar seedless raspberry jam
Mix cake as directed on box.  Once cake mix is well mixed, add in lemon zest.  Fill cupcake liners with about 1 spoon full batter.  Add in 1 tsp of raspberry jam to each cupcake liner.  Fill liners with remaining lemon batter.  Bake as directed on box. 
{With these cupcakes, the jam will fall to the bottom of cupcake ... Totally normal}

Raspberry Whip Frosting
1 cup real butter ~ unsalted
1/2 cup seedless raspberry jam
3-4 cups powdered sugar

Mix all ingredients together till fluffy.  Spread or pipe onto cupcakes. 

Thursday, May 5, 2011

Food Storage

I have recieved a couple emails about my food storage.  So here are the answers to those & a couple pictures showing what it looks like. 

How big is your storage?
  ~Not sure about the actual square footage, but who does know that?  It is in my laundry room.  My husband and I remodeled our laundry room & added a toy room off of it.  Then we designed some shelving that would be good for all the food storage.

How do you organize it all?
  ~When I but items for storage, I put the newest in the back.  That way I am sure to use all the older ones before expiring.  I also have it all grouped into sections.  Baking, Boxed, Canned, etc.

How often do you buy for your storage?
  ~I buy every month for food storage.  I don't buy huge lots every month, but I do buy a few things.  I am one that doesn't like to have a low storage. 

This is what you see right when you open the door to my laundry room.  All the shelving with my canning items, paper goods, cleaning products, canned/bottled items, etc.  The very top shelving {not shown} is holding my crock pot, canning pots, punch bowl, truffle dish, serving tier, etc.


Then off to your right, when you walk in there is this.
This is all my canned goods, baking items, boxed items, noodle, etc.  I will be honest ... don't judge me ...this is kind of low right now.  I usually have it more stocked than this.  Need to get on it!  Usually the items in my can rotator, are completely full.  L.O.V.E my can rotating racks! The top shelving of this {not shown} holds random things like, small bins, wrapping paper, gift bags, etc.

White Bread

Some of you know, but for those who don't ... I rarely buy bread.  I just make it.  Yes it time consuming.  But, I love it.  There is no store bought bread that even comes close to the goodness of homemade bread.  I love the smell it leaves in the house.  On average, I usually do about 2 batches a week.  That gives me a total of 6 loaves.  {1 batch = 3 loaves} I then just wrap them up, number them and stick them in the freezer.  {Start with the lowest number first. Oldest to Newest.}  This way if I am sick, or am not able to do bread, we have a little stash.  When I went to delivery my youngest, about a year ago, we have 15 loaves out in the freezer. 

Little tip with bread making ...Measurements of all ingredients should be exact.


White Bread
1 package yeast {1 pkg = 2 1/4 tsp}
2 cups warm water
1 cup sugar
1/2 cup butter or margarine ~ melted
1 1/2 tsp salt
2 large eggs ~ beaten
7-8 cups flour

Dissolve yeast in warm water.  Once dissolved, add in sugar, butter, salt, eggs and 4 cups flour.  Beat until smooth.  Stir in enough remaining flour {about 3 1/2 cups for me} to form a soft dough.  Once dough is mixed, turn onto floured surface and knead until smooth and elastic, about 6-8 minutes.  Place dough in greased bowl.  Cover and let rise in a warm place until dough has doubled in size. Once doubled, Punch down.  Shape into loaves and place dough into 3 greased bread pans.  Cover & let rise again until doubled {Doubled=Top of dough should be even or little above pan rim}

Bake at 350 degrees for 25-30 minutes or until bread is golden brown.  Remove from pans to wire cooling racks.  Let cool completely before wrapping.

Spinach Chicken Stromboli

What is a Stromboli?
   ~ Type of turnover filled with various cheeses & meats.  The dough is Italian bread. 

 This is a simple Stromboli recipe.  You won't have to go out and hunt for any weird, unheard of, strange ingredients.  With this delicious recipe you can a variety of things ... Vegetables, Meat & Carbs.  You can also use different meat in it to make it fit your craving. I made 2 ~ One I put the mozzarella cheese inside of it & the other I put it on the top of it. Yummy either way.

Spinach Chicken Stromboli
1 refrigerated pizza crust
2 tsp olive oil
1/2 tsp Italian seaoning
3 1/2 tbsp parmesan cheese ~ canned
1 1/2 cup shredded mozzarella cheese
2 cups spinach leaves ~ loosely packed
2 cups shredded chicken ~ cooked
2 roma tomatoes ~ diced
Pasta sauce of choice for dipping

On floured surface, roll pizza dough into a 12x15 rectangle.  Brush about 1 1/2 tsp olive oil over the entire dough surface.  Sprinkle Italian seasoning & 2 tbsp parmesan cheese evenly over dough  Evenly spread spinach, chicken, tomatoes & mozzarella cheese over dough ~ Keeping the toppings about one inch away from edges.

Working from the long side of rectangle, roll the dough up from one end to the other, like you do with cinnamon rolls.  Pinch the dough seam shut and then tuck ends under.  Place seam down on a a greased baking sheet. Brush remaining olive oil on top of roll and sprinkle with remaining parmesan cheese.  Make 3 small slits on top of the Stromboli. 

Bake at temperature directed on pizza dough package.  Bake for 15-20 minutes, or until the dough is golden brown.  Cool for 10 minutes before slicing into 1-2 inch slices.  Serve with choice of dipping sauce. 

Monday, May 2, 2011

Menu Planning & Grocery Shopping

How do you plan your Dinner Menu?  Do you plan a menu of meals?  How do you go grocery shopping?  How many grocery trips do you make for making dinner?  So many questions & so many answers to questions like these.

Here is how I do it all. I created a couple print out "charts."


{If you would like to give these a try, feel free creating your own, or leave a comment with your email and I will send you the document to save & print off!}

I go grocery shopping once a month, at the beginning of the month. Yep, you read it right .. Once a month.  That is it.  I will go back when we need items like, milk, eggs, fruit, etc.  Other than that I stay away.  
It actually helps save some money, for us. 
I pick 10-11 meals a month & that is what we have for dinners.  We do left overs on days after I have cooked for a couple days.   I always ask my family what they would like to have for dinner.  That way it gets us all involved!  After I picked the meals and treats/goodies, I then write/type it all out on the What's Cookin ... and Extras sheet, so I know exactly what ingredients that I need for what meals.  Then, I make my list on the Grocery List sheet.  I have it all organized by groups dairy, meat, canned, frozen, etc. This helps me keep a straight shopping trip & no back & forth trips in the store. I can also write how many I need or items next to it, which helps make a quick grab from shelf & into cart.  Also, I know this is not possible for some, but I do not take my kids grocery shopping with me.  It isn't that they aren't good, they do great.  It is that I just want to have that time alone.  Sound weird?  I hope not.  

Here is what is on our Dinner Menu this month ...
Chicken Enchiladas with Tossed Salad
Fried Tacos with Fruit
Pizza Rolls with Raspberry Salad
Grilled Cheese Sandwiches with Chips
Rice & Meatballs with Steamed Vegetables
Tortellini Spinach back with Creamy Lemon Sauce
Meat Pies
Easy Beef Enchiladas with Chips & Salsa
Spinach Chicken Stromboli
Grilled Chicken with Lemon Spaghetti

Our Extras are ....
Lemon Raspberry Cupcakes
Chocolate Mousse Chruch Cake
White Chocolate Popcorn
Strawberry Lime Smoothies

Slow Cooker Pulled Pork

I am sure some of you are thinking, "I have a recipe for Pulled Pork."  I am also pretty sure it calls fir Cocoa Cola in it.  Well this recipe is a little different.  It has 2 ingredients, if you don't count the meat.  My husband made this for dinner this weekend.  That is right ... I have a hubby that can cook!  He can also do many other things, but what girl doesn't find it very attractive when she spots her hubby in the kitchen cooking?


Slow Cooker Pulled Pork 
1 (2 pound) pork tenderloin
1 (12 fluid ounce) can or bottle root beer
1 (18 ounce) bottle your favorite barbecue sauce
8 hamburger buns, split and lightly toasted

Place the pork tenderloin in a slow cooker; pour the root beer over the meat. Cover and cook on low until well cooked and the pork shreds easily, 6 to 7 hours. Note: the actual length of time may vary according to individual slow cooker. Drain well. Stir in barbecue sauce. Serve over hamburger buns.  
*You can even use this in salads.  

Chicken & Stuffing Casserole

This is one recipe that you can do ahead a little.  I, most of the time, will cut & cook my chicken ahead of time, meaning the week I am going to make it, and then freeze it.  Then when I go to make this dish, I just have to pull it out & throw it all together in the dish.  Then it is quick & ready to go when I need it to cook. 

Chicken and Stuffing Casserole
3-4 chicken breasts ~  cut into bite sized pieces
1 box chicken flavored stuffing
1 can cream of chicken soup
*I have also used cream of mushroom, just for variety
1 can cream of celery soup
1 1/4 cup chicken broth 
1 soup can milk

Cut chicken breasts & cook till done.  Place chicken in bottom of lightly greased 9x13 dish.  Sprinkle dry stuffing mix over chicken.  In a separate bowl,  mix cream of chicken soup & cream of celery soup.  Add chicken broth and milk into soup mixture.  Mix well and pour soup mixture evenly over the stuffing.  

Bake at 350 degrees for 25-30 minutes, or until middle of casserole is bubbling. 

Sunday, May 1, 2011

Lollipop Cookies

Also known as Balloon Cookies, Play Dough Cookies, and Rainbow Cookies. I will warn you, these are another recipe that your hands get pretty messy.  Spray hands with cooking spray & section of counter top you use.  Makes things easier, trust me.  Though they do create some mess, these are such fun & very creative.  My girls have a blast making these & then love sharing them with friends & neighbors.  They each get to pick a couple colors & have fun with all the mixing.  You can either make these swirl & form a lollipop or you can just smash colors together for some fun "tie died" cookies. You don't have to make them with sticks.  Every time we make these, they are different colors.  A very enjoyable time with kids.  I love it.


Lollipop Cookies
3/4 cup butter ~ softened
3 ounces cream cheese ~ softened
1 cup white sugar
1 egg
1 teaspoon vanilla extract
2 3/4 cups all-purpose flour
1 teaspoon baking powder
1/4 teaspoon salt
assorted colors of  food coloring
24 lollipop sticks

In large bowl, cream together butter, cream cheese and sugar until fluffy. Add in egg and vanilla; beat cream mixture till smooth.  In separate bowl, combine flour, baking powder and salt. Add dry ingredients to the creamed mixture, slowly. Stir till soft dough forms. Dough will be "tacky."  If too tacky, add a little more flour.  Divide dough into fourths & put in separate bowls.  Tint each with a different food color. Once well colored to desire, wrap in plastic wrap and chill for at least 2 hours. Dough is also fine to sit over night. 

Working with half of each color, shape dough into 3/4 inch balls and for each cookie place 1 color together & make 1 large ball.  Shape into a 6-12 inch long roll (like a snake), starting at one end, coil roll to make about a  2 3/4 inch round cookie. Place cookies 3 inches apart on lightly greased baking sheet. Carefully insert lollipop sticks into bottoms of cookies.  

Bake at 350 degrees for 8 minutes or until lightly browned. Cool and store in an airtight container.  

Zesty Italian Pasta Salad

This is a favorite at our house in the summer.  It is light, full of flavor, easy & yummy!  Plus it is crisp & cold.  You can really put any vegetable into this salad.  Which is great.  You can make it with what you have on hand if ya don't feel like going to the story for certain items. Adding chicken into the salad is also another yummy ingredient.

Zesty Italian Pasta Salad
1 (16 oz.) package spaghetti noodles
1 cup cucumber ~ chopped
1 cup olives ~ chopped
1 cup carrots ~ chopped
1 cup cauliflower ~ chopped
1 cup  celery ~  chopped
1/2 a 16 oz Zesty Italian Dressing
1/2 cup fresh grated Parmesan

Cook spaghetti according to package directions.  While noodles are cooking, chop all vegetables into bite size pieces.  Drain noodles & rinse with cool water.   Alternating ingredients, {Vegetables, noddles, vegetables, noodles, etc} add them into large serving bowl.  Add in Italian dressing & toss.  Make sure all vegetables have not "sunk" to bottom of bowl. Top with Parmesan cheese & refrigerate before serving.

Orange Creamsicle Cupcakes

I am so ready for summer to be here.  Luckily this next week, is going to provide some really nice spring weather.  I will take it!  In the spirit of spring & summer, we {my girls & I} have been making a lot of items that have those summer "flavors."  Oh the joy! Plus, don't we all enjoy a Creamsicle sometimes?

Orange Creamsicle Cupcakes
1 yellow cake mix
2 eggs
1 cup milk
2-3 drops yellow food coloring
1-2 drops red food coloring
1/3 cup orange juice concentrate
whipping cream ~ fresh

Mix yellow cake mix, eggs, and milk together.  Once well mixed, add in yellow & red food coloring to make a nice orange color. Pour batter into cupcake liners and fill about 3/4 full.

Bake at 350 degrees for 15-18 minutes, or until cake springs back while lightly touched.  

Once cupcakes are completely cool, If you don't have a Bismarck Tip for filling pastries, cut out small portion of center, about size of quarter, set "tops" next to cupcake.  

In a separate bowl, whip the cream till it forms soft peaks.  Fold in 1/3 cup orange juice concentrate into the whipped cream. Pipe filling into center of cupcakes {or spoon filling into centers, if not using a Bismarck Tip and add tops back onto cupcakes}.  Frost with remaining orange cream or just plain whipped cream. 

Homemade Whipped Cream
2 cups heavy whipping cream
1/4 - 1/2 cup powdered sugar
(Depends on flavor preference)

Pour creaminto large mixxing bowl and whip at low speed.  Gradually increase speed till cream thickens and forms soft peaks.  

Add in powdered sugar & mix on low speed till well blended.

Keep whipped cream refrigerated.

Onion Tips

A little "Did You Know" on onions ... 

Vidalia onions are amazing! They have so much flavor.

Yellow onions frequently have lower sulfur levels than white ones do

Look for onions that feel dry and solid all over, with no soft spots or sprouts. The neck should be tightly closed and the outer skin should have a crackly feel and a shiny appearance. Onions should smell mild, even if their flavor is not. Avoid selecting onions with green areas or dark patches.

Pick your onions that appear to be heavy for their size. The skin should be dry and papery. There should be no soft spots of black spots, indicating mildew from moisture.

 When making soups or stews, dried diced onions are great.  They add the flavor of onion, but also are quick & easy.

Onions grown in soil with a high sulfur content will be harsher than ones grown in other types of soil. It's the sulfur in onions that causes the strong taste and makes your eyes water when you cut into it.

Purple/Red onions are prime onions for hamburgers.  They add so much flavor & a nice crisp texture.